Mesh count is one of the first variables that screen printers should understand.
Screens for screen printing aren’t just sold in different size. They’re sold in different mesh counts, which you can think of like the resolution of the screen.
Since screens are just woven nylon threads, mesh counts describe exactly how many threads you’ll find in a given area.
How to Decide Which Mesh Count You Should Use?
To decide which mesh count you need to use, you should consider the details of the print:
- What material (substrate) is being printed on?
- What ink is being used?
- How much detail does the image have?
One of the most important parts of successful screen printing is understanding how mesh count relate to print quality. Screens come in a wide range of mesh options. Ultimately, it’s your job to understand which mesh works with each garment, each image, and each ink.
While multiple mesh counts are standard in any screen printing shop, they all have their unique uses for the highest quality output.
You can store this information in your screen printing management software and make it easier for employees to choose the right mesh.
Image detail
As the detail of your image goes up, so does your mesh count.
You don’t need a high mesh count for something simple like a one-color logo or large text. But for a complicated image, you’ll want the highest mesh possible.
We’ll get into how to calculate how much detail your image can contain with a metric called LPI (lines per inch) later.
Thickness and type of ink
If you use thicker inks (particularly inks that contain additives like glitter), you’ll want to use a lower mesh count.
This allows more space between the threads on the screen so that ink can pass through the screen freely. Because of this limitation with thick ink, you also need to consider that your images should be simpler.
When using extremely thin inks (like water based inks or discharge inks), you’ll need to use a higher mesh count. The thinner threads and smaller gaps will allow less ink through.
Struggling to manage your inks? Learn more about screen printing ink here.
Material (substrate)
Different materials (substrates) require different mesh counts.
Here’s why: both the screen you’re using to print with and the material you’re printing on are made out of woven materials arranged in a grid.
While your screen may be able to hold a great deal of detail, the t-shirt you’re printing on is made up of a bunch of tightly woven threads. So your t-shirt, too, has a “resolution” that it can hold.
Besides the makeup of the actual substrate, you’ve also got to consider whether the material is right for the ink you want to use.
The bottom line: make sure your ink, substrate, and image all align with your mesh count.
What Can Happen If You Choose The Wrong Mesh Count
If you’re just printing big one-color logos in black ink, you probably don’t need to think about mesh count too much.
But if you want to print anything beyond extremely simple logos and designs, understand what goes wrong when you don’t use the right mesh.
Blurred Imagery
The most common problem with choosing the wrong mesh is blurred images.
Typically, screen printers will try to print an image with too much detail for their screens. While the result may be passable, it often means losing a significant amount of detail in the finished image.
If you’re printing photorealistic images, halftones, or other images that require complex details, make sure you choose the right mesh count for the image. Learn how in the section about Understanding Screen Printing Mesh Numbers below.
Poor Ink Deposit
You can print with the wrong mesh count and achieve a decent image, but the actual ink deposit may be very poor.
If your mesh count is too high, you may not deposit enough ink. The image will appear faded, or the ink deposit will be far too thin to be durable.
If your mesh count is too low, you will probably deposit too much ink. The image will appear “blown out,” and the ink deposit will be too think. It’s likely you won’t be able to reliably cure this ink, and it may wash out.
Spoilage (Ruined Garments)
Using the wrong mesh is a sure-fire way to cause spoilage in your shop.
If you use the wrong mesh, you will almost certainly destroy some garments. Do you want to spend $5, $10, or even $20 on new shirts or hoodies for a customer?
Even if you are able to remove the ink from the garments, you’ve wasted valuable time in your shop and probably still need to burn your screens again.
Screens Dry Too Fast
This concern is slightly different than the others, since it has to do with production and not print quality.
You often can’t correct for this: water-based inks used on high mesh screens tend to dry out quickly. The physics behind this are simple: since a high mesh count screen has so much surface area, more air is able to touch the mesh and remove moisture from it.
This means that you’ll constantly battle with hydrating and cleaning high mesh screens when producing a large order with water based inks. Certain supplements can help combat dried ink: retarders often keep flowing smoothly.
Shops using water-based or UV inks will tend to use a higher mesh count screen as well.
While you can’t switch mesh counts for this last problem, you can at least prepare for it by understanding that you’ll need to add humidity and some time to account for ink changes and screen cleaning during a high-volume run with high mesh counts.
Understanding Screen Printing Mesh Numbers
Know the different metrics and details that can inform your decision when you shop for screens. This will help you make better decisions.
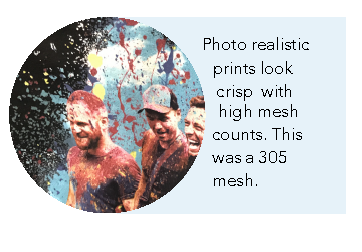
Remember: screens are made up of woven threads. Mesh numbers help us describe the exact details of how thin or dense this weave is.
Typically, you’ll see two numbers listed alongside any mesh.
Let’s use a screen that’s listed as 156-64 to explain mesh count numbers. This is one of the most common mesh numbers that you’ll see in any screen printing shop.
Mesh count per inch, a simple and standard term and mesh diameter, a secondary metric that can help you further understand what each screen can do, are both listed here.
Let’s break down what each number means.
Mesh Count Per Inch
In our 156-64 example, the mesh count per inch is 156.
The first number corresponds to how many openings are in a 1-inch square area. This means a 156-64 screen has 156 openings in a 1″ by 1″ area.
Lower mesh numbers, like 80, have 80 openings for the ink to go through for each square inch. Higher mesh numbers have many more spots for the ink to pass through during the screen printing process.
A mesh count per inch of 156 is a versatile screen for both fonts and images with a moderate amount of detail.
Mesh Diameter
In our 156-64 example, the mesh diameter is 64.
Mesh diameter is expressed in microns, an extremely small measurement. For scale, a typical human hair is about 60-70 microns across – so the size of a single thread on a screen is similar to the size of a single hair.
Understanding the diameter of the mesh is crucial to producing a lasting print.
Mesh diameters are usually listed as the second number in a mesh count. They’re not always listed.
How Mesh Count and Mesh Diameter Relate
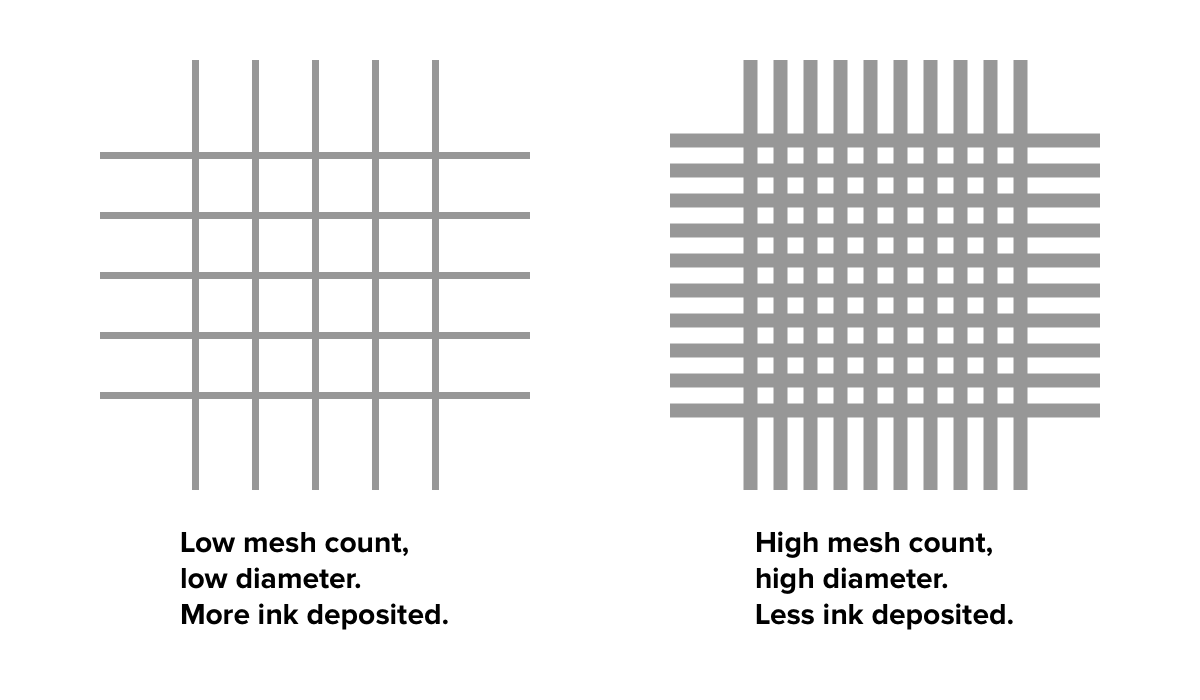
Mesh diameter can be helpful for determining how much ink will actually pass through a screen.
Here’s an example: which screen will deposit more ink, a 156-64 screen or a 230-48 screen?
Did you guess that the 230-48 screen will deposit more ink, since it has a higher mesh count? Wrong!
The 156-64 screen will actually deposit more ink. It has larger openings.
Low Mesh Count Screens: For Thicker Inks
There are two low-count mesh standards that are used in screen printing shops: 30 to 61 mesh and 80 to 86 mesh.
These low-count screens are ideal for simple text, big logos, and other images that don’t really require much detail.
Low mesh screens are best when used with plastisol and thicker inks.
Important: lower mesh screens hold more emulsion than higher mesh – meaning that you’ll need to expose these screens longer to allow the emulsion to set properly.
30 to 61 Mesh Count Screens: For High Density and Glitter Inks
These screens are considered a coarse mesh that is best for thicker inks.
Most 30-61 mesh counts are only used for high density and glitter inks.
These inks contain larger particles. That means the ink needs a large opening to pass through: imagine pushing a piece of glitter through a very small opening!
High density inks are another popular use for coarse mesh screens. This ink is spectacularly thick and leaves a pronounced raised surface on the garment.
80 to 86 Mesh Count Screens: For Metallic Inks, Athletic Wear, and Heavy Inks
The common use for these screens is printing heavy underbases for athleticwear applications.
You’ll want to use a thick underbase to prevent dye migration and ink bleeds on materials like polyesters.
Metallic inks also may require an 80 to 86 mesh count based on the manufacturer’s recommendations.
This type of low mesh count is ideal for laying down heavy ink deposits with high opacity.
Medium Mesh Count Screens: The Most Common Screens
Medium mesh count screens are the most commonly used and widely available screens in screen printing.
Water based inks are best used on medium-mesh screens.
110 to 135 Mesh Count
This is an industry standard mesh count with an exceptionally wide range of applications.
This mesh count range can handle everything from text to spot colors.
If you’re unsure which mesh count to use, start here as a baseline and compare your results.
156 Mesh Count: Higher Quality Images
Another common mesh in screen printing shops, 156 mesh count screens are a perfect balance of quality and ink deposit.
You can print images, text, and other details with 156 mesh count screens or cover large areas adequately.
196 Mesh Count: For Finer Details, Neck Tags, Less Ink Deposit
This finer medium-mesh count is a great choice to capture details, fine lines, and smaller text like neck tags.
196+ mesh is also extremely useful for preventing very thin inks from bleeding through the material you’re printing on. This is because the mesh openings are so small that they only allow a tiny amount of ink to be deposited.
Printing your neck tags with this mesh is ideal. You could also use this mesh when printing lighter inks on dark fabric, since you don’t need to deposit much ink.
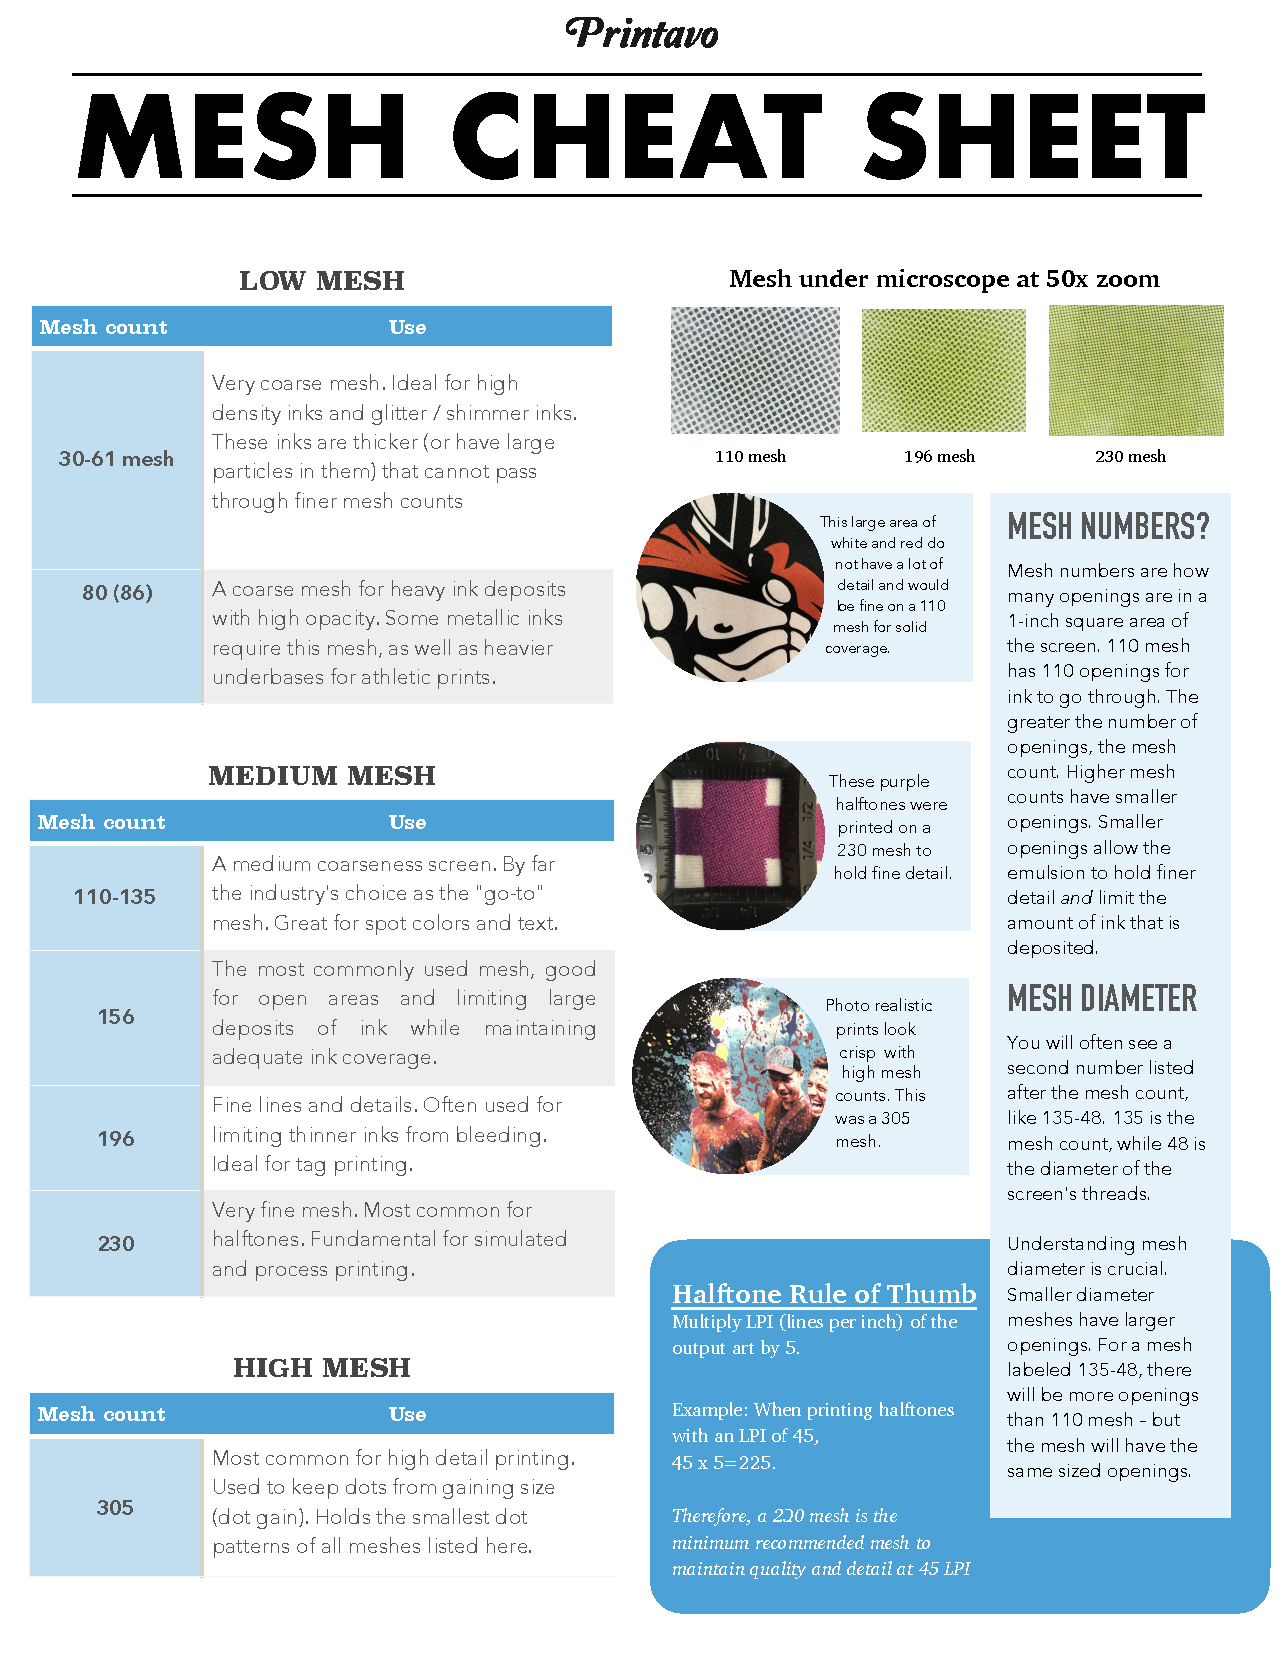
High Mesh Counts: Photorealism, Halftones, and Beyond
If you print complex halftones, simulated process imagery, or simply want to get photorealistic detail out of your prints, you’ll want to consider very high mesh screens.
Very thin inks (like UV inks or very thin water based and discharge inks) also do well on high mesh counts.
230 Mesh Count: Halftones, Detailed Sim Process
View this post on Instagram
Halftones are essentially a series of dots.
As the image gets more complex, the dots need to get smaller and smaller.
To capture each dot, you’ll need adequate space on the screen (and the substrate). That means choosing an exceptionally high mesh count.
230 mesh and higher are typically used for complex halftone images.
Prints made with fine mesh counts often have a much softer hand feel than prints made with a lower count mesh. But the downside of this is that the limited ink deposit isn’t as bright or vibrant of an image.
305 Mesh Count: Super Fine!
This super-fine mesh can handle those tiny details that come together to make an awesome print.
305 mesh count screens lay down pinpricks of ink to reduce the chances of dot gain while printing halftone images.
Other Considerations When Choosing Mesh Count
What is Dot Gain?
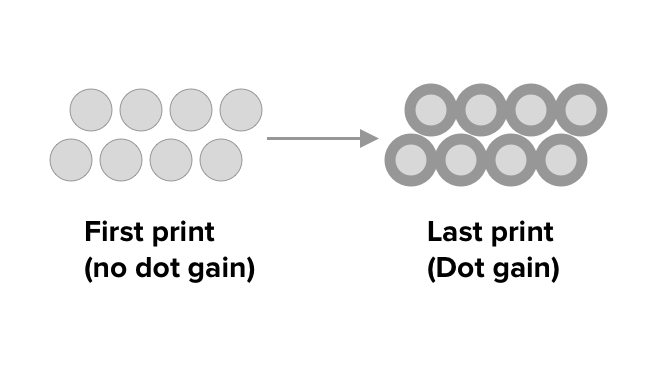
When printing halftone images, the emulsion may break down after repeated printing and cause something called dot gain.
This means that the first print will look sharp, while the 100th print will look blurry. This is because the dots have gained size, making the image less visible. The image will appear too dark, too bright, or otherwise “washed out.”
Some dot gain is unavoidable (and can be compensated for), but it can be almost completely eliminated if the right steps are taken.
Avoid dot gain by:
- Correctly understanding your emulsion
- Post-exposing your screens
- Using the correct mesh count for your artwork
Halftones: How To Relate Lines Per Inch (LPI) and Mesh Count
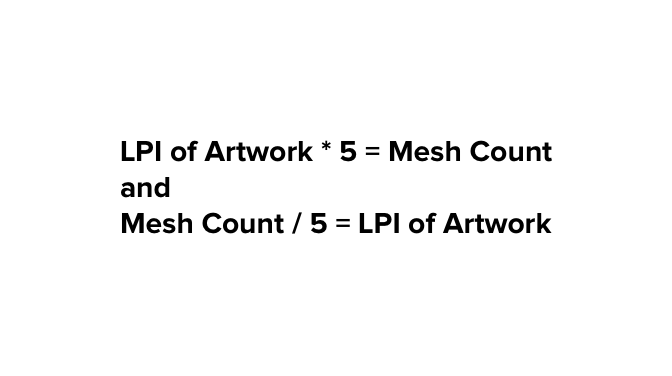
If you know the LPI (lines per inch) of any given piece of artwork, you can easily calculate the mesh count you’ll need. Here’s how to calculate the mesh count you’ll need to use:
Multiply the LPI of the artwork by 5 to get the correct screen mesh count for that artwork.
For example, if we know that the art we’re printing has a LPI of 40, we simply multiply 40 by 5 to get 200 mesh.
That means we’ll need around a 200 mesh screen to get the resolution we’ll need to make a great image.
You can also do this backwards. How many LPI can a given mesh hold?
Take your mesh count (let’s say 156) and divide it by 5. That gives us 31. We can safely assume a 156 mesh screen can easily account for art that’s 31 LPI.
Note: in reality, you can probably get away with using a lower mesh count and higher LPI than we suggest. But we want to help you get great results.
This article was written under the guidance of Matt Marcotte. Matt is a member of Printavo’s Customer Success Team and has more than a decade in professional screen printing – from sales to production management.

0 Comments