
Last updated December 24th, 2019
Join us in 2020 for more webinars! Be sure to follow us on Crowdcast to get automatic emails each time we create a new webinar event.
The key to using Zapier and Printavo is understanding what’s available for you to automate and how to actually automate it. So we’ve put together this guide and held several webinars to help you.
Our third webinar will be during the first week in December. We’ll let you know about it beforehand! Follow us on Crowdcast to get updates or subscribe to our YouTube channel.
You can watch parts 1 and 2 below at any time to get caught up!
Supercharge Your Shop, Part 1: The Fundamentals
This is a recording of a webinar held on November 8th, 2019.
First, we must clearly define how information moves between Printavo, Zapier, and other apps on the web.
Two specific automations can occur: triggers and actions.
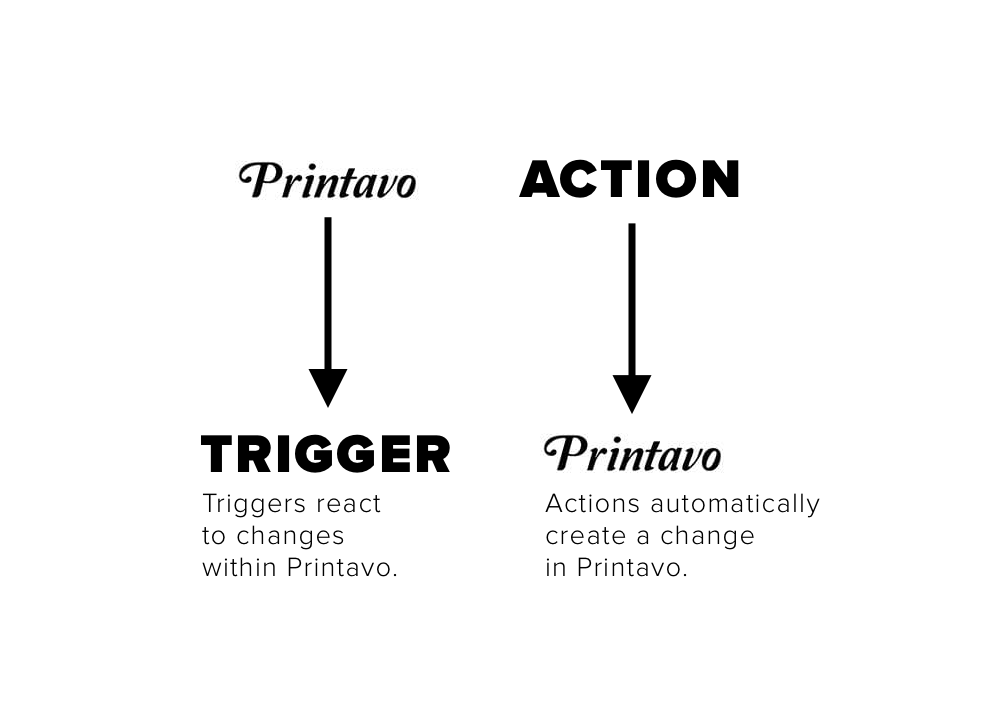
Triggers originate from changes that happen in Printavo.
When a trigger event happens within Printavo, Zapier triggers an automated process. When you see “trigger,” think: an event in Printavo makes something else happen.
This is important because triggers are how to get Printavo to do something to an app.
The following Triggers are available for Printavo within Zapier:
New Customer
This trigger is activated by: creating a New Customer in Printavo.
Why to use it: trigger marketing emails and events, notify staff, automatically contact the person
New Payment
This trigger is activated by: a new completed payment in Printavo.
Why to use it: notify staff, follow-up thank you emails,
New Inquiry
This trigger is activated by: a new inquiry in Printavo.
Why to use it: trigger marketing emails and events, notify staff, automatically contact the person
New Task
This trigger is activated by: the creation of a new Task in Printavo.
Important note: this trigger is not activated by assigning an existing Task.
Updated Quote/Invoice
This trigger is activated by: any change to a Quote or Invoice in Printavo.
Important note: this trigger is activated by any change to a Quote or Invoice, no matter how small. This trigger is extremely powerful and can quickly use your monthly quota of allotted Zaps.
New Quote/Invoice
This trigger is activated by: creating a new Quote or Invoice in Printavo.
Why to use it: set in motion production processes, use segmented marketing messaging
New Expense
This trigger is activated by: creating a new Expense in Printavo.
Why to use it: notify staff
New Invoice Status
This trigger is activated by: creating a brand new Invoice Status in Printavo.
Important note: this is NOT the trigger to use if you want a Status Change to trigger automation.
This trigger is activated when a brand new Invoice Status is created. It will not trigger by changing a status!
THIS IS NOT THE SAME AS CHANGING A STATUS!
What it does: when an entirely new Invoice Status is created, automation occurs.
New User
This trigger is activated by: creating a New User in Printavo.
What it does: triggers an automation through the creation of a New User.
How to use it: onboard new team members
Actions originate from changes and events outside of Printavo.
When an action event happens, Zapier performs an action to Printavo. When you see “action,” think: an event outside of Printavo makes a change to Printavo.
This is important because actions are how to get an app to do something to Printavo.
There are two primary action types: Creation actions (where you make something in Printavo) and Search actions (where you look something up in Printavo).
The following actions are available:
Creation Actions
Create Customer
What it is: when this action occurs, a new Customer is created in Printavo.
Create Payment
What it is: when this action occurs, a new Payment is created in Printavo.
Create Inquiry
What it is: when this action occurs, a new Inquiry is created in Printavo.
Create Quote/Invoice
What it is: when this action occurs, a new Quote or Invoice is created in Printavo.
Create Expense
What it is: when this action occurs, a new Expense is created in Printavo.
Create Task
What it is: when this action occurs, a new Task is created in Printavo.
Search Actions
Find Customer
What it is: when this action occurs, a new Customer is created in Printavo.
Find Quote/Invoice
What it is: when this action occurs, a new Quote/Invoicer is created in Printavo.
Search and Creation Actions
Finally, Zapier is also capable of more complicated actions that perform search and/or creation.
This is a two-step process: the first step searches for a quote/invoice/customer in Printavo, and the second step either returns the matching result or creates a new quote/invoice/customer.
Find or Create Quote/Invoice
What it is: when this action occurs, Zapier searches for a Quote/Invoice in Printavo. If it’s not found, a new Quote/Invoice is created in Printavo.
Find or Create Customer
What it is: when this action occurs, Zapier searches for a Customer in Printavo. If they are not found, a new Customer is created in Printavo.
Zapier Filters: supercharge your Zaps
We will cover these filters further in future webinars. You can start using them with the sample Zap below.
Paths
Similar to multiple Zaps at once.
They’re conditions with routes for information.
Example: “if this happens, then automation should occur”
Filters
Determine whether automation should occur or not.
Example: “only continue if the date is November 8th”
Delays
Determine when automation should occur.
Example: “don’t send for 5 days”
Formatters
Difficult to use, so test carefully.
Reconfigures data into a more useful format.
Example: Reconfigure certain data so Printavo can read it (dates, for example)
Supercharge Your Shop, Part 2: Printavo and Zapier
This is a recording of a webinar held on November 22nd, 2019.
Now that you know the basics, we’ll dive deeper into what’s possible with Printavo and Zapier.
One of the most common questions is “How do I change a status in Printavo and have it do something in Zapier?”
The answer to that can be found in the Zap below. You change a status to “Delivered,” and 5 days later a “Review Us” email is sent. It even checks to see if the customer has been sent the email before so you don’t re-send it.
But, as I mention in the longer webinar above, this sort of setup can be used to do all sorts of other fascinating things. So learn it well and understand it before moving forward.
A huge thanks to everyone for joining us for our second webinar!
Change a status in Printavo, automatically send a “Review Us!” email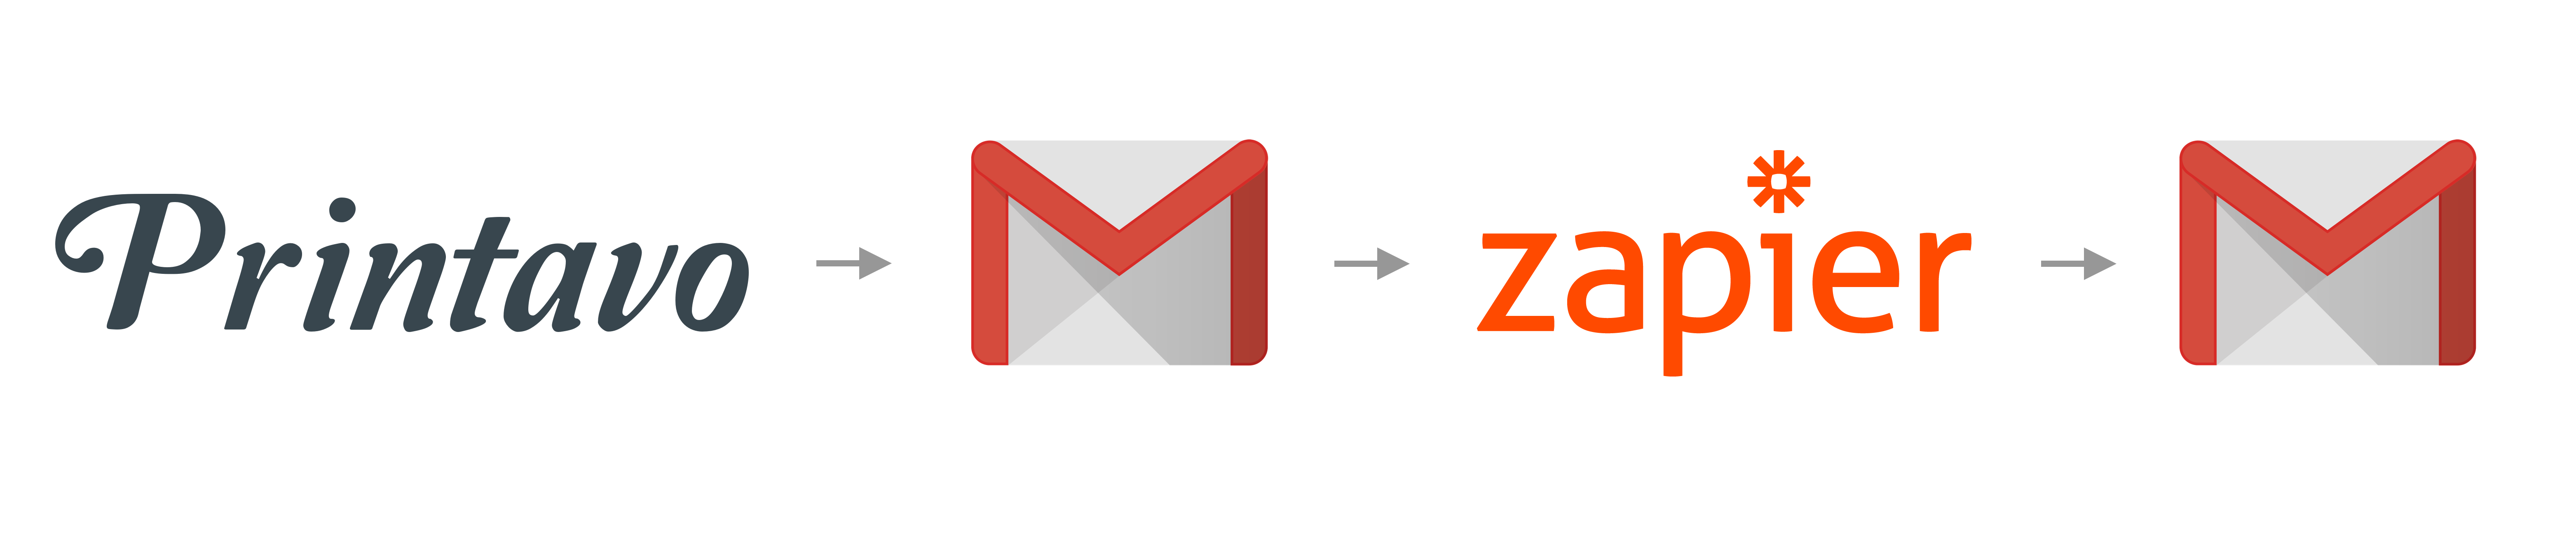
Why to use it: On the surface, this will help you get more reviews automatically. At a deeper level, the reason to learn this Zap is because it covers virtually every area of Zapier: filters, functions, delays, custom data and much more.
What it does: Send customers a custom Review Us email after 5 days, first checking to see if they’ve already been sent a Review Us email.
How it works: You change a status in Printavo to “Delivered” and Zapier handles the rest. By connecting Gmail, Printavo, and Google Sheets, you create a powerful automated chain that requires a single input (changing a status in Printavo) to initiate.
Here’s the basic pathway so that you understand how we’re going to achieve this:
- Status in Printavo is set to “Delivered”
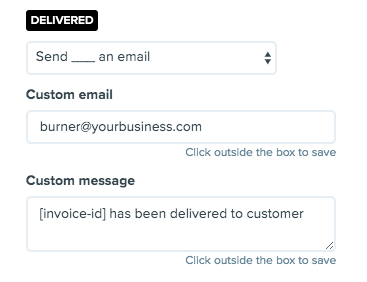
- Printavo Status Change Notification email is sent to “burner@yourcompany.com”
- Zapier sees that email
- Zapier asks Printavo for more information about that order
- Zapier checks to see if that customer has been sent a Review Us email on your “Do Not Send List”
- Zapier waits for a set amount of time
- Zapier asks Gmail to send your “Review Us” email
- Zapier asks Sheets to document it each time a Review Us email is sent to a “Do Not Send List”
Don’t stop with this Zap! Think: How else could you use a Status in Printavo to trigger another app to do something useful? This is the key Zap that will let you leverage Printavo’s Statuses to do all sorts of amazing things. Some ideas include press start and stop times, tracking downtime, documenting art approvals…and much more. The possibilities are staggering!
Step 1: Setup
Here’s what this step does in plain English: sets up the three web applications (Gmail, Printavo, and Google Sheets) that will talk to each other through Zapier. You will create a new Status and Status Change Notification in Printavo, as well as a new Quote for testing.
Where: Gmail, Printavo, Google Sheets
What: Create a burner email account, create a Status and Status Change Notification in Printavo, and create a Do Not Send list.
Why: These are the apps that your Zap will connect.
How: This step has 4 parts.
- Create a new Gmail account called “Burner”. Basically just “burner@yourbusiness.com”. This spare email inbox will be very helpful (you’ll see why soon).
- Create a Status and Status Change Notification in Printavo. To keep it simple, call it “Delivered”. You can call it whatever you like, just remember what the Status is called (we’ll use it later).
- Create a new Quote/Invoice Printavo for testing. Use this Quote/Invoice to set up your Zap and do testing. Use yourself as a customer so you can receive all test emails.
- Create a new Google Sheet. Call this Sheet “Do Not Send List”. Write “Do Not Send” in Cell A1. You’ll use this to document people you’ve sent an email to. You could use this same concept (a sheet that tracks an event) for virtually anything else.
Step 2: Make Zapier look for a Printavo Status Change Notification Email
Here’s what this step does in plain English: it searches a Gmail account for emails that contain the word “Delivered” in the subject.
Where: Zapier
What: Gmail app
Why: Use Zapier to search your burner inbox to see if a Status Change Notification has been sent that has the title “Delivered.”
How: Here are the steps Zapier will have you follow:
- Choose App & Event
- Choose app: Gmail
- Choose Trigger Event: New Email Matching Search
- Choose Account
- Gmail account: burner@yourcompany.com (Use your burner account address)
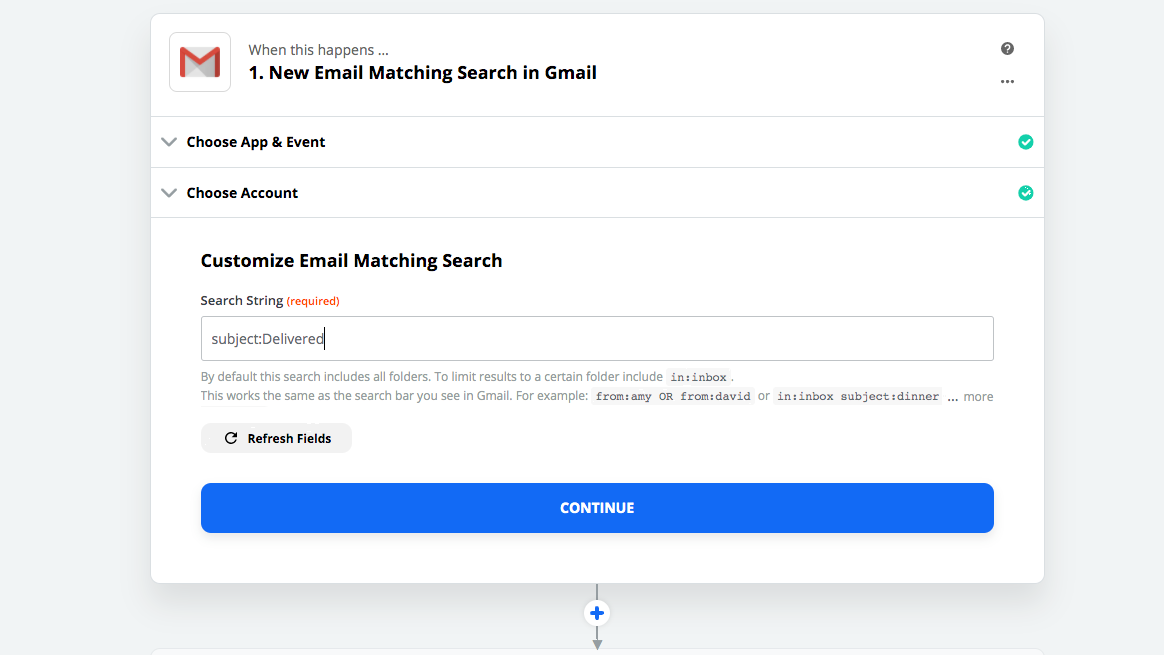
- Customize Email Matching Search
- subject:Delivered
- There are a huge number of additional search operators available. For now, just understand that we’re searching the burner account’s incoming subject lines for the word “Delivered.”
- Find Data
- Email Matching Search A.
- This tests that everything is set up.
Step 3: Make Zapier ask Printavo for more information about the order
In plain English: We’ll ask Printavo for more information about the order by using the email that our Status Change Notification sent. Then we can use that information to send a custom, detailed email to our customer.
Where: Zapier
What: Printavo
Why: Use Zapier to ask Printavo for the customer’s email address and name for the order that had its status changed to “Delivered.” Note: most of the information in your Printavo order can be accessed this way.
How: Here are the steps Zapier will have you follow.
- Choose App & Event
- Choose app: Printavo
- Choose Action Event: Find Quote/Invoice
- Choose Account
- Printavo account: Select your account
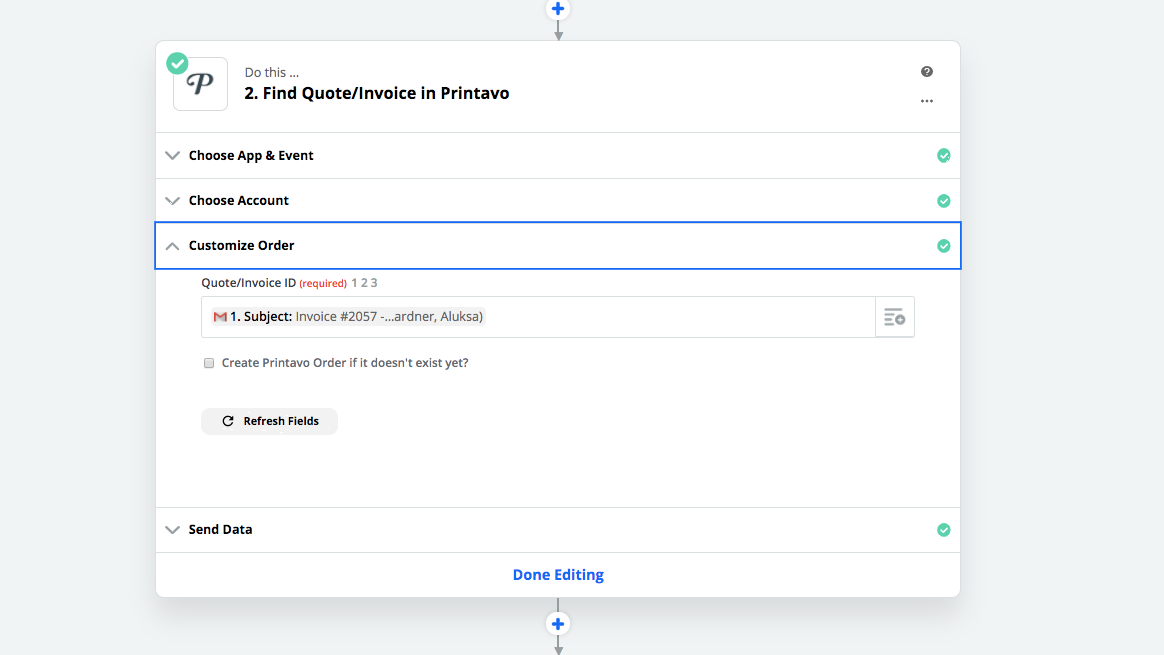
- Customize Order
- Quote/Invoice ID
- Under “New Email Matching Search,” select “Subject”
- Leave “Create Printavo Order if it doesn’t exist yet?” unchecked
- Send Data
- Use this to test your Zap
Step 4: Make Zapier use Google Sheets to check your “Do Not Send List”
Here’s what this step does in plain English: this checks your “Do Not Send List” to see if you have sent the customer a Review Us email.
Where: Zapier
What: Google Sheets, your “Do Not Send List”
Why: Check that your customer has not already been sent a Review Us email.
How: Here are the steps Zapier will have you follow.
- Choose App & Event
- Choose App: Google Sheets
- Choose Action Event: Lookup Spreadsheet Row
- Choose Account
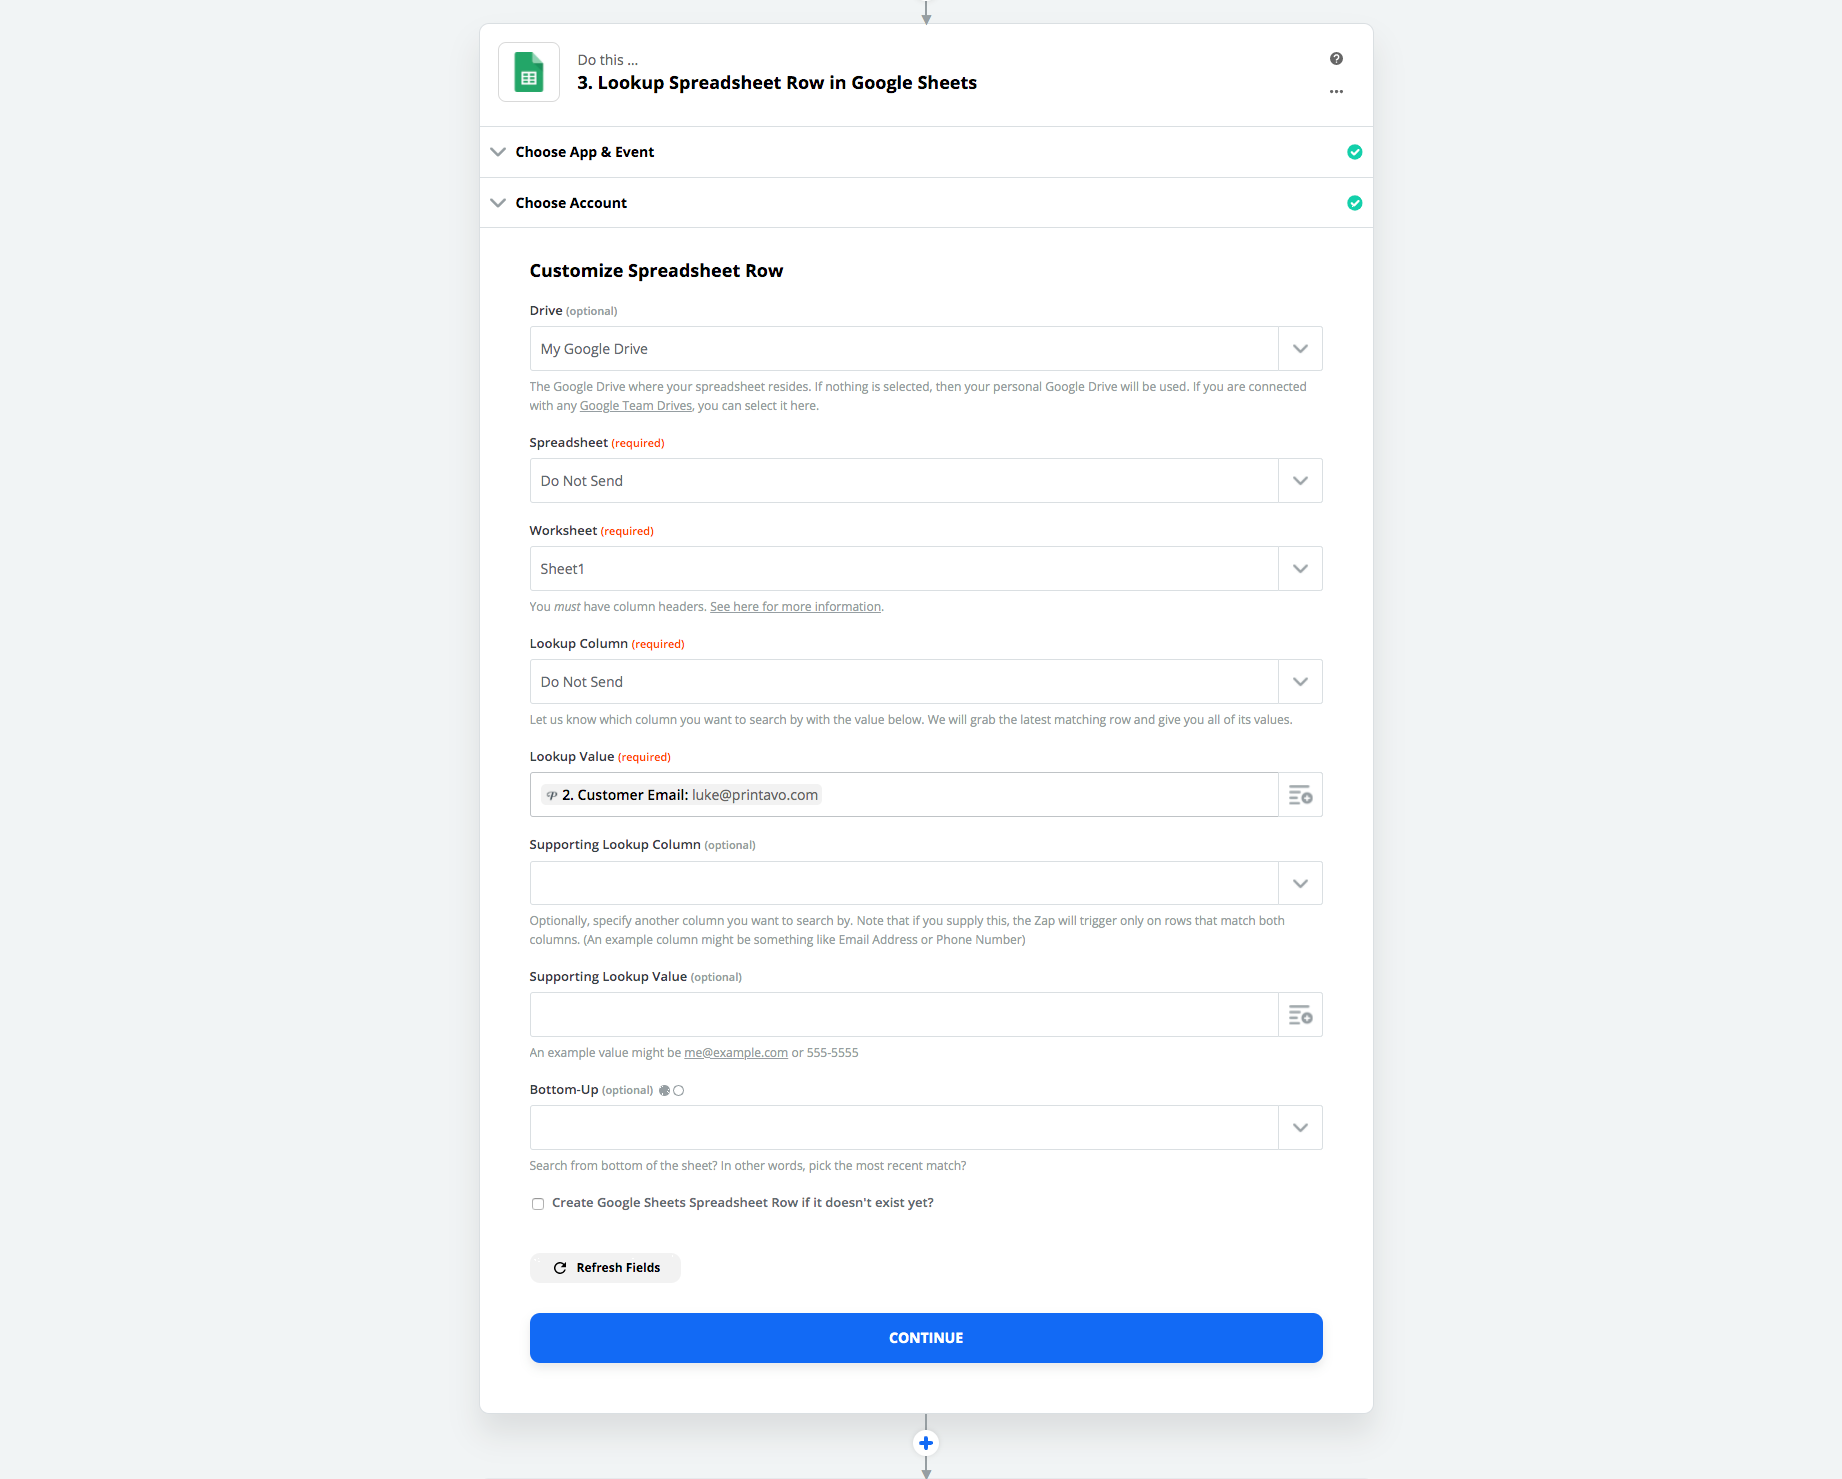
- Customize Spreadsheet Row
- Spreadsheet: Do Not Send List
- Worksheet: Sheet1
- Lookup Column: Do Not Send (i.e. Column A)
- Lookup Value: Find Quote/Invoice (Printavo)
- Select “Customer Email”
- Send Data
- Test your Zap. It should not continue if the customer’s email address is already on the Do Not Send List.
Step 5: Tell Zapier to check the Do Not Send List
Where: Zapier
What: Filter by Zapier
Why: This uses Step 4 to decide whether to send a Review Us email or not
How: Here are the steps Zapier will have you follow.
- Choose App & Event
- Choose App: Filter by Zapier
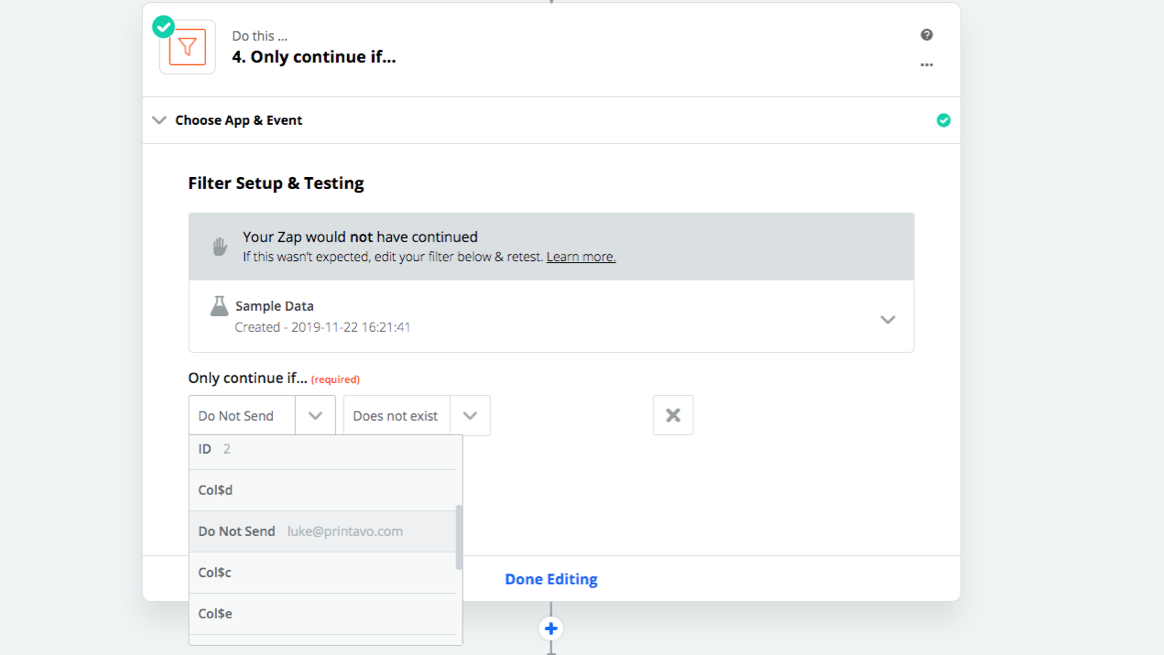
- Filter Setup & Testing
- Only continue if…
- First dropdown = Lookup Spreadsheet Row: Do Not Send
- Second dropdown = Does not exist
- Test It
- The result should yield “Your Zap would not have not have continued” if the customer’s email is on your Do Not Send List. Otherwise, it will send the Review Us email.
Step 6: Delay sending the email for several days
Note: skip this step during testing. We suggest adding the Delay last.
Where: Zapier
What: Delay by Zapier
Why: This waits for a set amount of time (which you choose) before sending the Review Us email
How: Here are the steps Zapier will have you follow.
- Choose App & Event
- Choose App: Delay by Zapier
- Choose Action Event: Delay For
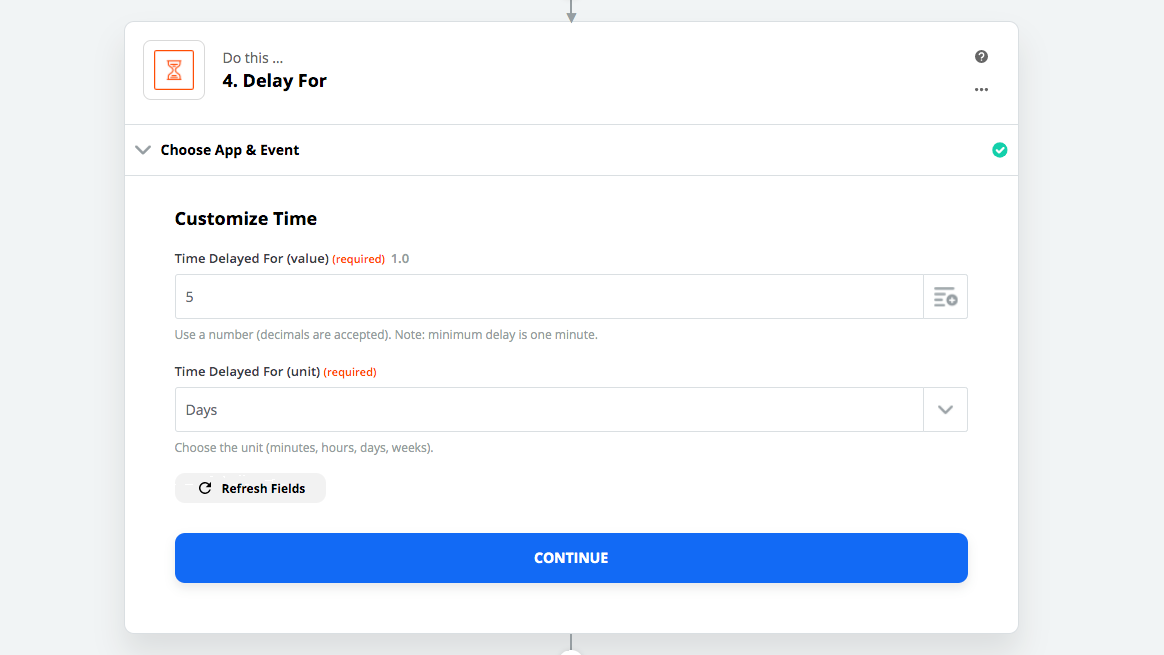
- Customize Time
- Time Delayed For (value): 5
- Time Delayed For (unit): Days
- Note: you can choose whatever delay you’d like
- Send Data
- Skip this step during testing, or it will not send your email for 5 days.
Step 7: Send your Review Us email
In plain English: you’ll set up the details of your Review Us email. This is the most important step since it is what your customer will actually see: the Review Us email!
Where: Gmail (within Zapier)
What: Gmail
Why: Lets you set up your customized Review Us email with custom user data.
How: Here are the steps Zapier will have you follow.
- Choose App & Event
- Choose App: Gmail
- Choose Action Event: Send Email
- Choose Account
- Select the email account you’d like to send your Review Us emails from
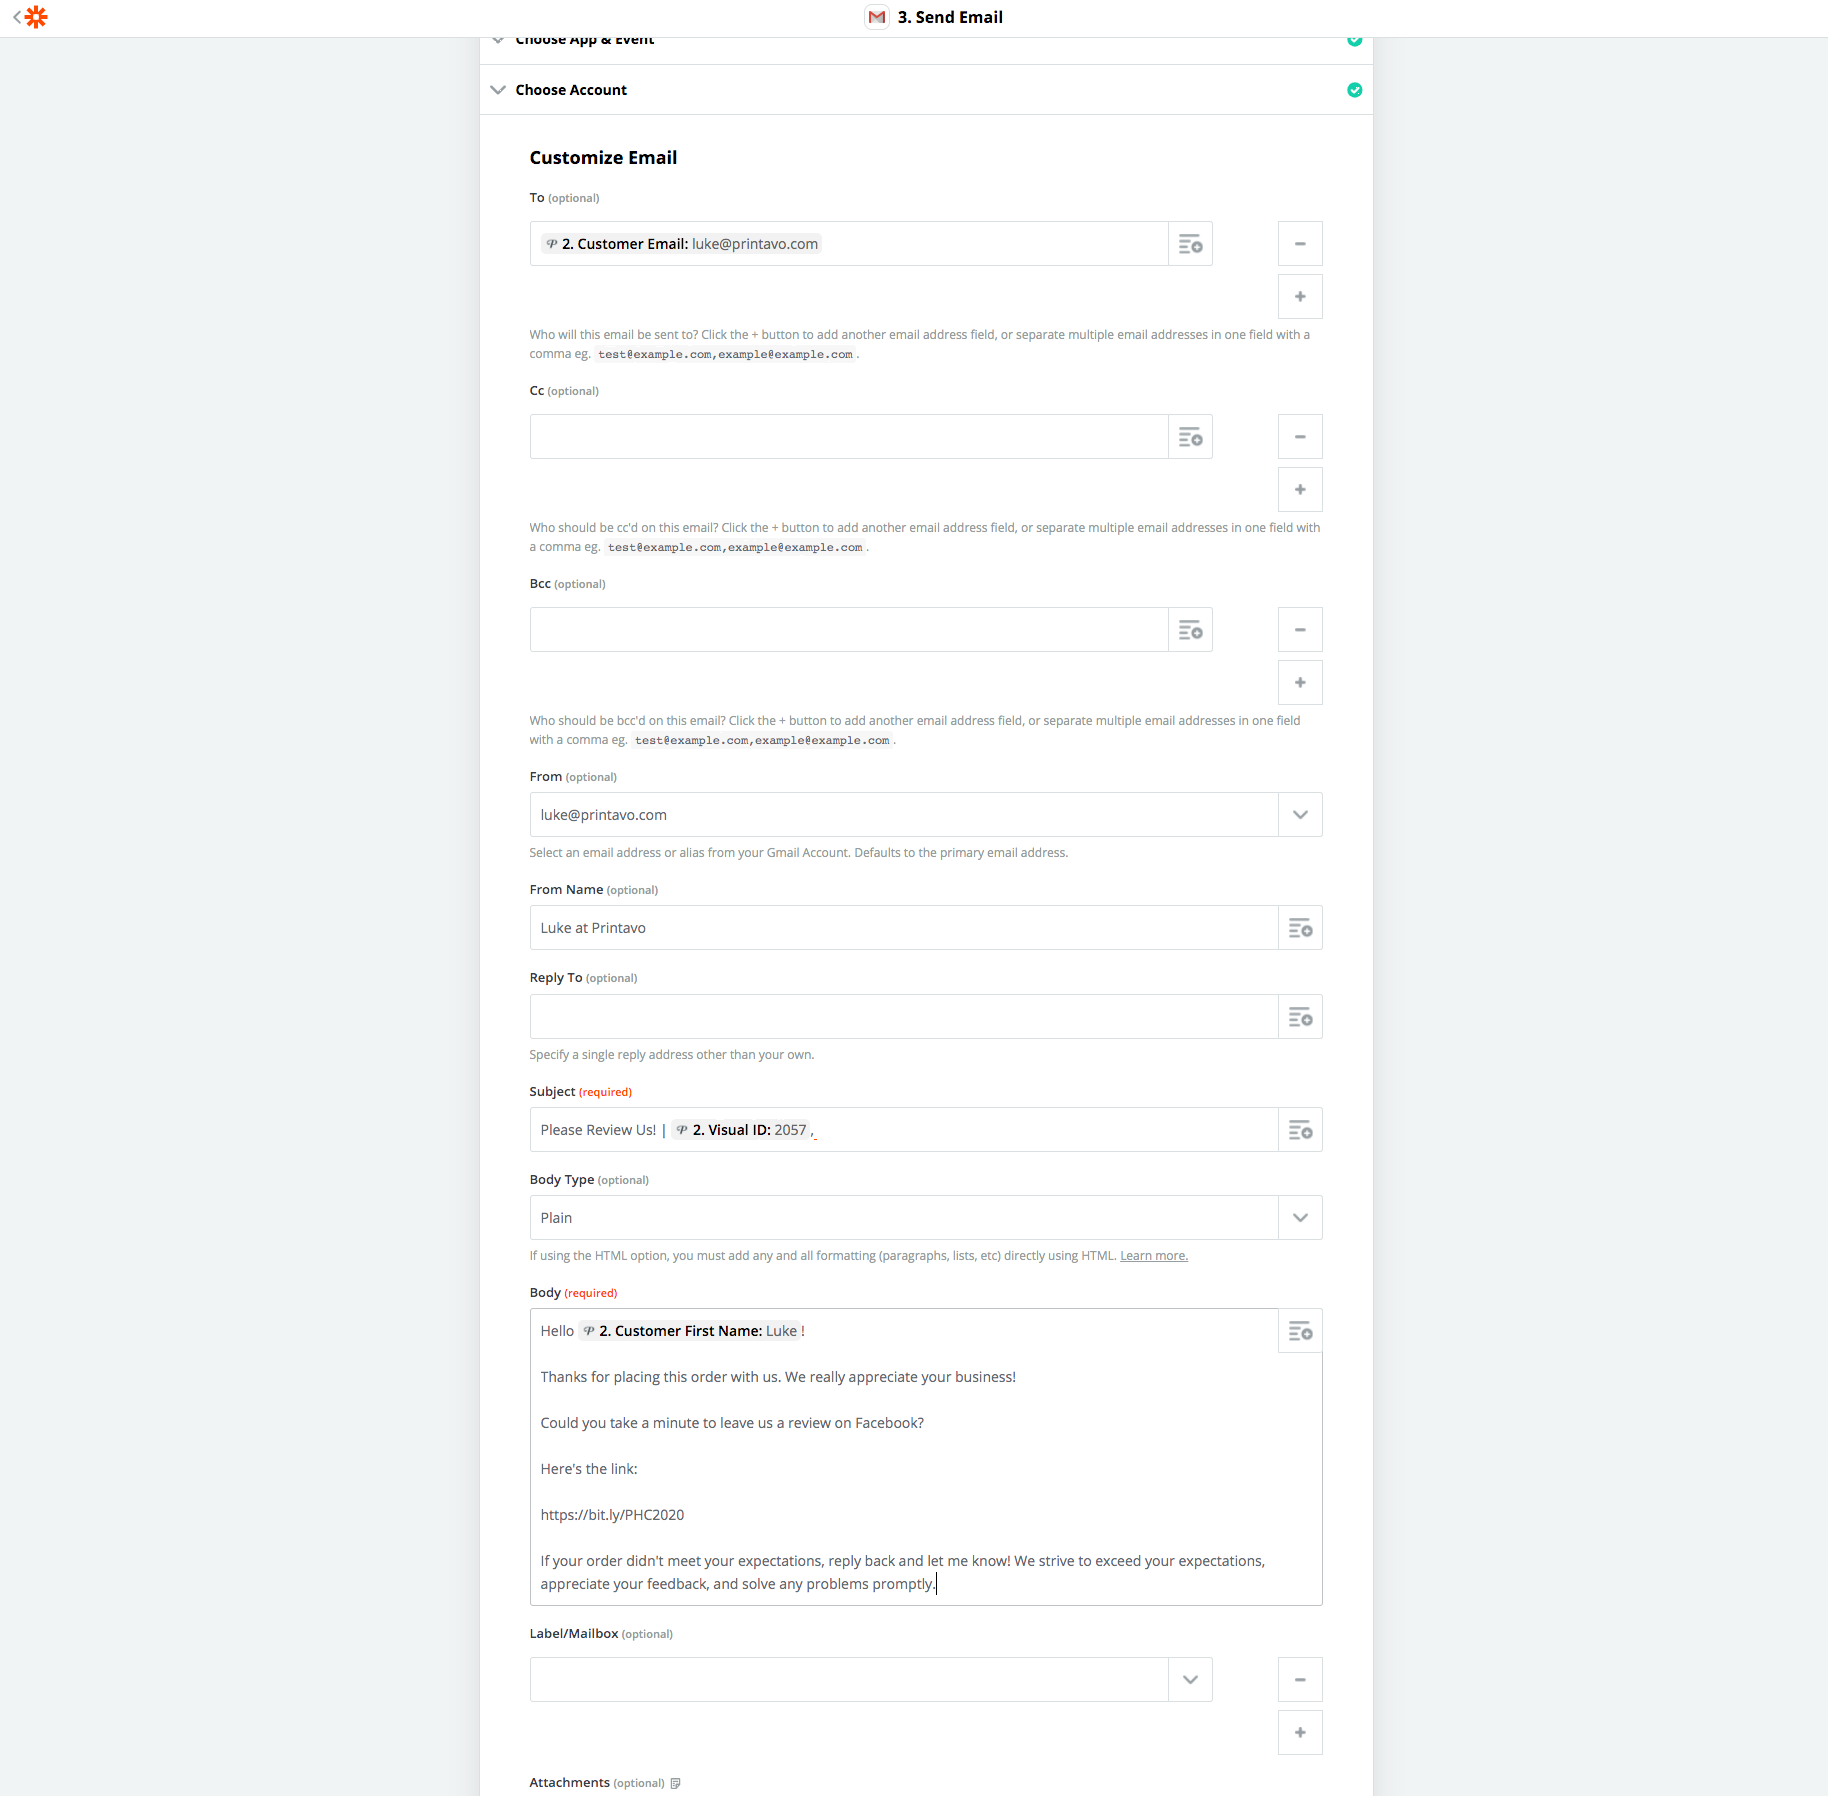
- Customize Email
- Select Find Quote/Invoice (Printavo) as the source for your data
- To: Select “Customer Email”
- From: Select which email address is shown as the sender
- From Name: Add a personal name (a nice touch)
- Subject: Put a catchy subject. You can use personalized data from the Printavo order (such as the customer’s name) here.
- Body: This is the body of the email you’ll send. Add a link to your preferred review site: Facebook, Google, Yelp, etc. Tip: close the email by asking any dissatisfied customers to call your shop before they leave a review.
- Send Data
- This will send the test email. Look it over for accuracy.
You can customize this Review Us email as much as you’d like, even using HTML to stylize it as needed. Remember: click the + button to insert custom values from Printavo. You can insert the customer’s name and/or order name from Printavo in the subject, for instance.
Step 8: Write to your “Do Not Send List” when an email is sent
In plain English: write a customer’s email to a Google Sheet when a Review Us email is sent.

Where: Google Sheets (within Zapier)
What: Google Sheets
Why: Documents every Review Us email that’s been sent in a simple format
How: Here are the steps Zapier will have you follow.
- Choose App & Event
- Choose App: Google Sheets
- Choose Action Event: Create Spreadsheet Row
- Choose Account
- Select your Google Sheets account
- Customize Spreadsheet Row
- Spreadsheet: Do Not Send List (select your Sheet)
- Worksheet: Sheet1
- Under the final pulldown menu: select “Find Quote/Invoice” from Printavo, then select “Customer Email.” This tells Zapier to write the Customer Email to your selected Sheet.
- Send Data
- Test the Zap. It should write to your Do Not Send List immediately.
From here, you’re done! Test your Zap and implement it on a trial basis to see how it performs for you. Multiple webinar attendees have reported an increase in reviews from implementing this sort of system. Let us know what you come up with!
Supercharge Your Shop, Pt. 3: Automate Invoices With Jotform and Printavo
This is a recording of a webinar held on December 13th, 2019.
In this webinar, you’ll learn how to set up a Jotform form on your website that creates a new Quote/Invoice in Printavo.
Watch as I build a new Zap integration from scratch, step-by-step.
Jotform is a powerful way to add a simple inquiry form to your website. Using Zapier, you can have that form generate an Invoice that you can follow up on through Printavo.
You could also dive much deeper than this Zap does, adding an entire wholesale catalog and even adding pricing!
However, this tutorial will show you the fundamental steps you’ll need to follow to set up this Zap. At its core, this lets you put a form on your website that will create bare-bones Quotes directly in Printavo. It’s super cool!

Join Printavo’s amazing community at PrintHustlers Conf 2020, an elite conference for the best and brightest in the custom apparel industry. Now in its fourth year, PrintHustlers Conf has brought shops from across the world (even Nigeria!) for two days of incredible presentations, seminars, and relationship building.
If you want to meet the industry’s biggest players, learn from the best, and have a blast at an incredible venue with truly inspiring people, then Printavo’s 2020 PrintHustlers Conf is where you want to be.
Where: Ace Hotel in Chicago
When: July 24-25, just after the ASI Chicago show.
What: A gathering of the industry’s finest for candid discussions and solution building (and some fun, too)
Curious to see what PrintHustlers Conf is like? Check out PrintHustlers Conf 2019 on YouTube with last year’s presentations and breakout sessions or read our in-depth recap of PrintHustlers 2019. Also, we owe a huge thanks to Ryonet, Allmade, M&R, Next Level Apparel, Supacolor, and Clubhouse Athletic for sponsoring PrintHustlers Conf 2019.
Tickets are selling faster this year than they were last year. We sold out nearly 45 days before the conference last year!
Reserve your space and get more info here.
But you don’t have to take our word for it. Here’s what they told us last year:
“Printavo’s PrintHustlers Conf is the best event we have attended for the last 2 years. The speakers have been great and have helped us in so many areas. We also appreciate the connections that we have made through this conference. It is obvious from attending that this event is not designed to make money off of those attending, but is truly an event created to help us and improve our industry. Printavo is really making a difference in our industry. Keep it up!”
0 Comments