
Print shops have a lot of questions. Questions like:
- How many jobs can we print today?
- How much spare capacity do we have?
- Can we use press #1 and #2 for this job, or are they taken?
- How do we track two different workflows at the same time?
Power Scheduler is designed to answer these questions – and so many more.
Contents
- What is Power Scheduler?
- Power Scheduler terms to know
- How Power Scheduler works
- How to get Power Scheduler
- Resources to help
A one-size-fits all solution is unrealistic for the custom printing industry. After all, it’s custom.
Every print shop has a different workflow, a different strategy, and different requirements. That’s why Power Scheduler is flexible from the foundation up. You build the workflows you want. You view what you want to view. You’re in control.
Throughout Printavo’s history, we’ve watched as shops struggle to:
- Effectively schedule jobs
- Estimate capacity
- Know when something should be printed
- Track multiple decoration types
- Track unique workflows
- Collect accurate information
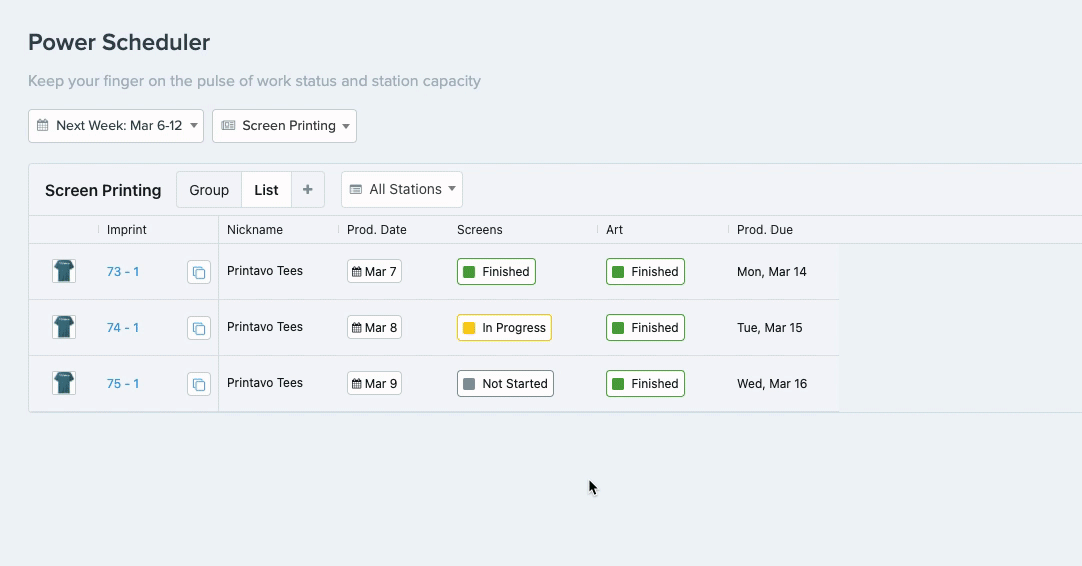
What is Power Scheduler?
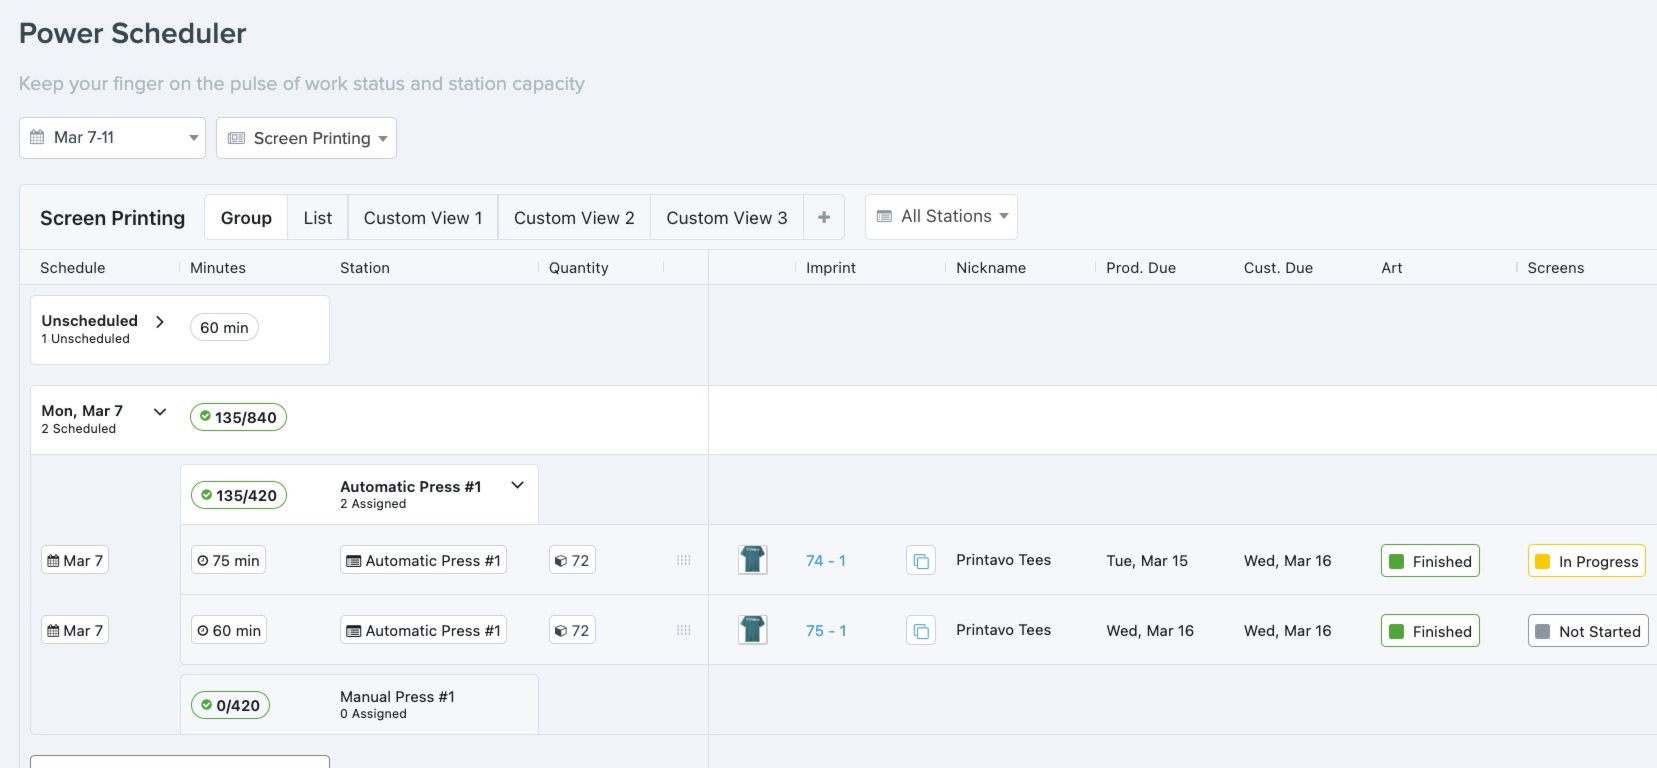
Power Scheduler is a tool for tracking capacity in your shop and monitoring work status for many jobs at once. At its core, Power Scheduler is like a digital assistant for production management.
Printavo’s Calendar view allows shops to see a limited number of jobs in a calendar format. Some common complaints included tracking jobs with multiple decoration types, keep track of dozens of jobs at once, and understanding when jobs needed to happen (i.e. where excess capacity is). Power Scheduler takes Printavo’s Calendar to the next level.
Power Scheduler is a robust custom scheduling platform built into Printavo.
Power Scheduler vocabulary and terms to know
To understand how Power Scheduler works, there are several terms you’ll need to know. Let’s learn the lingo:
Imprint is a single design.
If we were printing a t-shirt with one logo, it would have one imprint. If it had a logo on the front and back, it would have two imprints. If it had a logo on the front and back, and a custom tag, it would have three imprints (and so on).
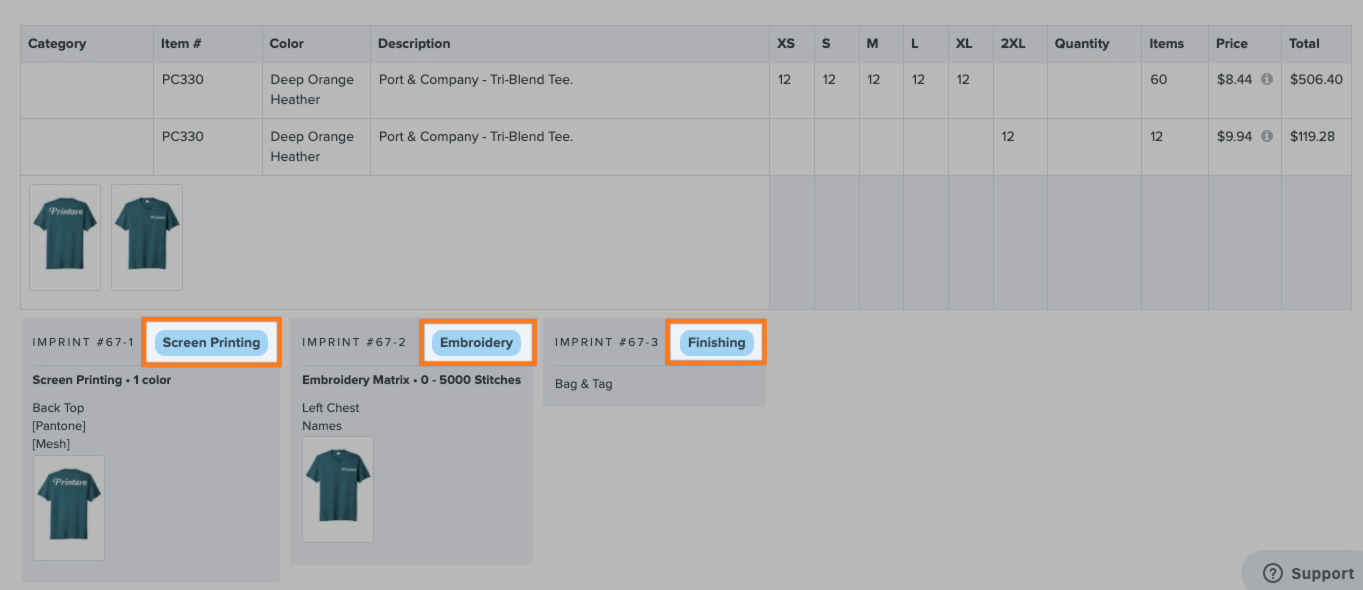
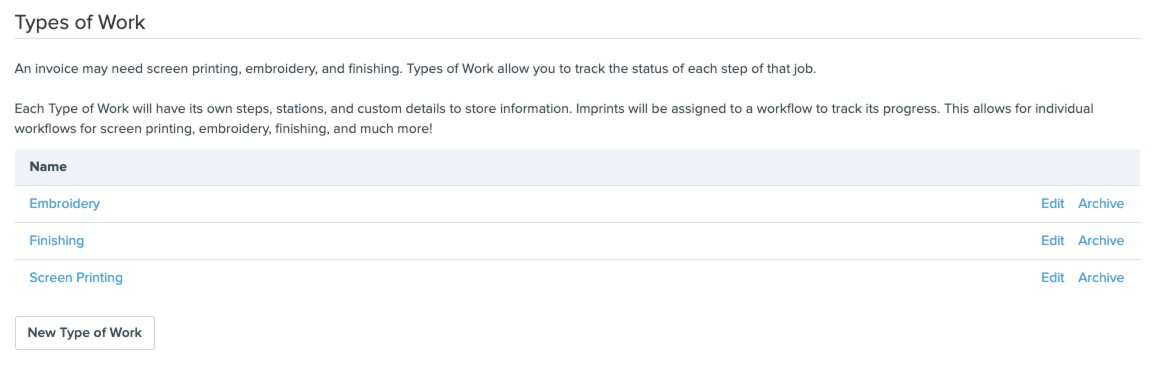
Types of work are decoration techniques.
These are workflows that are tracked through Power Scheduler. For example, you could track screen printing or embroidery, even though each technique has a different workflow.
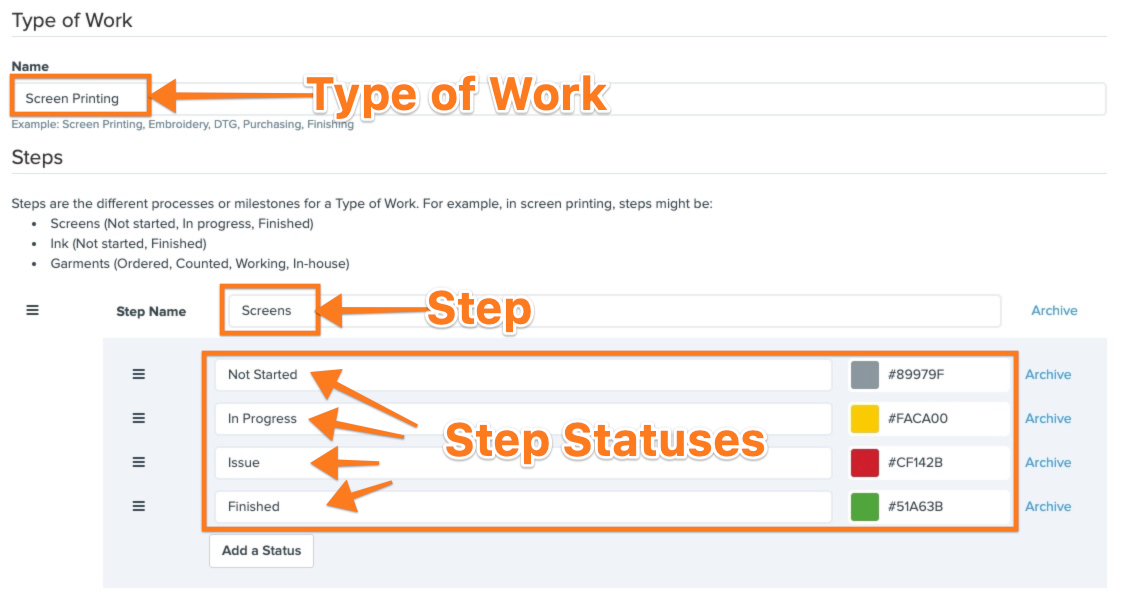
Steps are the major milestones for any type of work.
Steps are the most visible way to track the status of a job in Power Scheduler. Shops define their own steps for each type of work. For example, your DTG workflow may only have a few steps while your screen printing workflow could have many.
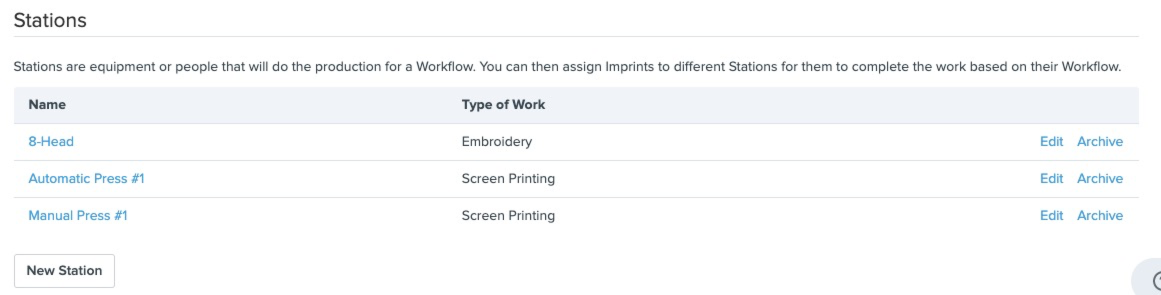
Stations are where the type of work happens.
Stations have capacity, shown in minutes. Stations may be employees, equipment, or any place where production happens. For example, you may set one press as a station or one employee as a station.
How Power Scheduler works
One of Power Scheduler’s most powerful features is that you choose when jobs appear on the Power Scheduler. You won’t see a cluttered, confusing, and confounding view of every job – you only see jobs when and where you want to.
Step 1: Decide when to send jobs to Power Scheduler
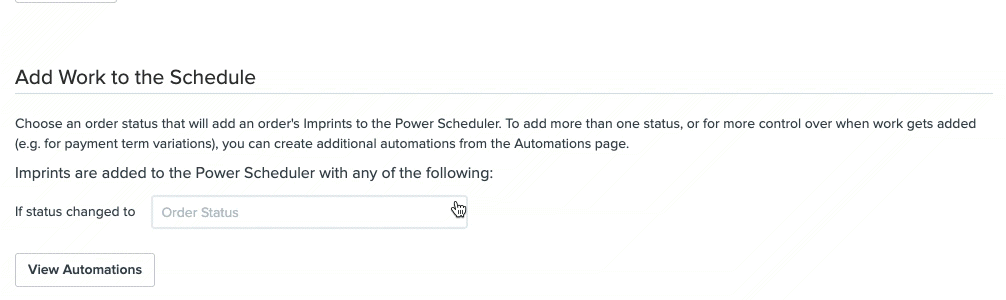
Jobs are only added to Power Scheduler when you want them to be. Automations allow jobs to move to Power Scheduler. You can also manually add jobs to Power Scheduler. For example, you may add jobs to Power Scheduler once they reach a status like “Art Approved” or “Payment Received.”
Step 2: Add an estimated time for each Station and Imprint
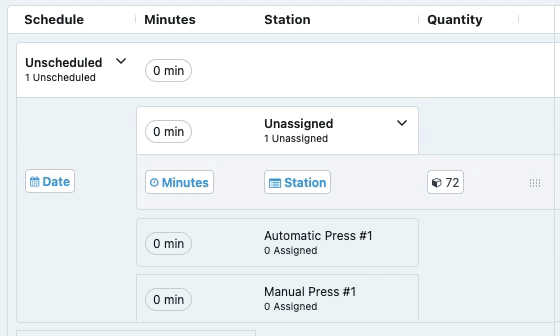
Imprints and Stations have estimated capacities (or times to completion) and are manually added by the user at this time.
Step 3: Assign Imprints to Stations
Stations have capacity (measured in minutes), allowing users to easily assign Imprints to the correct Station.
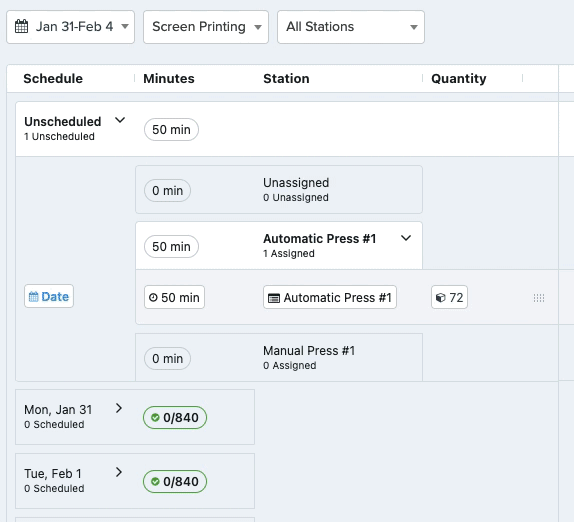
Step 4: Use Filters to define what you see
Filters allow a powerful customized view of the schedule. Users can sort by dates, types of work, and stations. For example, an embroidery employee could view their work for the day at their individual Station or look at all of the embroidery orders for the day through Types of Work.
Step 5: Change Step statuses to accurately reflect what’s happening
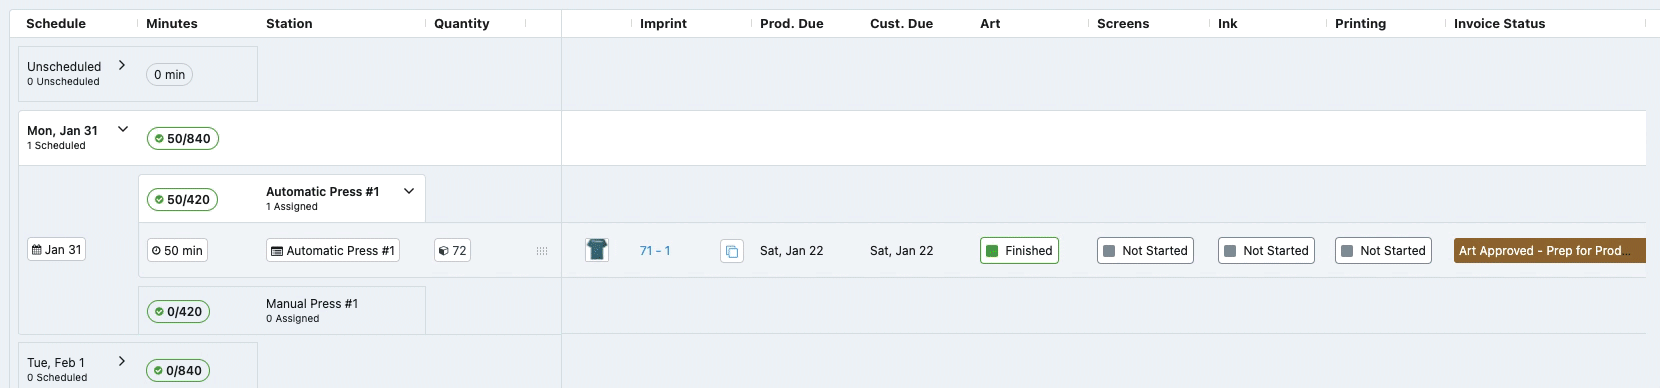
Users can modify the status of Steps in real time.
How to get Power Scheduler
To get Power Scheduler, you’ll need the newest Printavo Premium plan (priced at $399 per month or $3,990 annually). Long-time customers should contact us.
Upgrades and improvements will continue throughout the development of Power Scheduler (alongside Printavo, Merch, and all of our normal updates).
Resources to help you with Power Scheduler
While many parts of Power Scheduler are self-explanatory, we want to arm you with important resources to help you get the most out of Power Scheduler.
The Power Scheduler Manual is a robust guide, updated frequently to reflect recent changes to Power Scheduler. If you want to become a pro, read this guide.
Your Printavo Success Manager can give custom catered 1-on-1 guidance to help you with Power Scheduler. This service is only available for Printavo subscribers.
Got an idea or feedback? Provide feedback and ideas through this form.

0 Comments